In the event of a boarding, collision, or impact with an obstacle, fiberglass polyester composite hulls can suffer breaches or delamination that require composite repair. Whether it's a deep repair or a simple gel coat fix, follow the guide!
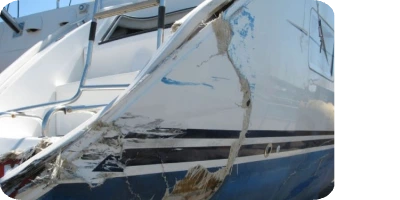
For damage up to 1 cm in diameter, you can fill it with epoxy putty or "choucroute" (a mixture of polyester resin and fiberglass), but for anything larger, you will need to laminate.
Even if the term sounds intimidating, this type of repair remains within reach for anyone who is motivated and equipped.
In an ideal world, you would repair delamination or a through-hull crack using double lamination, creating an inner skin and an outer skin.
I write "ideal world" because most modern polyester sailboats are equipped with a structural liner or furniture modules installed in the bilge that prevent access to the hull area requiring repair.
The presence of interior fittings, equipment, and furniture often prevents access from the inside.
We describe here the repair procedure from the outside, assuming the interior is inaccessible.
In cases where the interior remains accessible, you can skip the backing and "choucroute" step described below.
Pollutants, fouling, and grime do not mix well with sanders!
Clean the hull or the affected area with a high-pressure washer. Degrease with a solvent.

The goal is to expose the edges of the wound and remove all delaminated, damaged, and water-soaked material.
You can proceed with an angle grinder equipped with a sanding pad or an orbital sander with a coarse-grit disc, such as 80-grit. You must strip the composite down until you reach exclusively sound material.
The gel coat must be removed from an area extending 5 cm beyond the edges of the wound on all sides.
If the affected area appears very large, you must cut through the composite entirely. Oscillating multi-tools like a "Fein" saw equipped with metal blades make clean, precise cuts. In this case, you cut through the entire thickness or stop at a sound layer.

This sound layer will serve as a backing for the filler paste.
If the entire thickness of the composite is affected, you will need to cut through it completely.
In cases where it is not possible to repair from the inside as well, install a backing plate (plywood, Comacell, etc.) from the outside. The contour of the plate corresponding to the damaged area should be covered with adhesive filler and drilled to allow a string to pass through. Insert the backing and hold it in place by pulling on the string, which must then be secured.
Once this backing is in place, let it dry.

Avoid using expanded or extruded polystyrene; they melt when exposed to the styrene in the resins!
Then, in all cases, you must bevel the edges of the damaged area and thoroughly sand the entire work surface.

Once you have finished sanding, blow everything off to remove dust, then clean the entire area with acetone to ensure the surface is degreased.
Fiberglass filler, or fiber-reinforced polyester putty, is a fiber-filled compound that has lower mechanical strength than a laminate but is superior to standard finishing putty.
It is a paste with the consistency of a breakfast spread, composed of resin, hardener, and chopped fiberglass.
When you cannot laminate from the inside and are working on a backing (a piece of composite or a small board), the fiberglass filler acts as a patching compound. Fill the area while staying carefully below the edges of the damage. Subsequent layers of lamination should bring the surface flush.
If gravity is working against you and the filler tends to "run," use a piece of plastic wrap held in place with tape or straps.
Using a finer grit, such as 120, sand the fiberglass filler to create an even surface and refine its appearance.
The goal is to alternate layers of fiberglass to reach a level just below that of the surrounding gel coat, flush with the hull around the repair.
Prepare the resin and the precise amount of hardener. Whether you choose epoxy or polyester resin is up to you; while epoxy resins are waterproof, few polyester boats have underwater hulls made of epoxy.
If the ambient temperature is 68-72°F (20-22°C), you should still prefer epoxy for repairs, as it does not perform well in significantly lower temperatures.
Polyester resins are more flexible to use.
Alternate layers between mat (non-woven) and roving (woven) using a mat-roving-mat or mat-roving-mat-mat pattern for added thickness.
Depending on the depth of the gap to be laminated, 2 or 3 layers of this composition will be required.
Do not be tempted to add more, as the subsequent sanding must not expose the fiber.
Have a small container ready that is large enough to soak the pre-cut fiberglass pieces.
Protect yourself with gloves and a suitable mask if you are working indoors.
Cut your strips of fiberglass fabric to the desired dimensions.
Prepare a small amount of resin, enough to complete your entire task.
Divide it into two parts: one for soaking the fiber strips and one for coating the hull.
Brush the area to be covered with mat.

Place the mat strip(s) onto the hull.
Coat the mat with resin, then apply the roving strips that have been soaking for a minute.
Coat the freshly applied roving with resin, then install the mat layer.

Use a bubble-buster roller between each layer.
Alternate these steps while preparing new strips, or do so without too much delay. The resin dries and attracts dirt that will be problematic later.
Once the lamination is dry, it is often necessary to fill the repair to achieve a proper finish. You cannot sand the fiberglass too deeply, as you must never expose the fibers.
There are epoxy and polyester fillers. These fillers are different from fiberglass-reinforced filler (choucroute) because they do not contain fiber and therefore have no mechanical strength.
Epoxy fillers take longer to dry, but polyester fillers are not waterproof!
Once the filler is completely dry and hard, lightly sand it with a 120-grit sanding disc.
Dust off and degrease once more.
Apply the polyester epoxy filler in a thin, even layer.
Don't apply too much, as it will need to be sanded down, and polyester filler is hard!
Once the filler is dry, it's time to clean and dust the area again before applying the gelcoat touch-up, which we will describe in detail later in this article.

Whether you have just finished a deeper repair, are dealing with cracks, or have damaged your gelcoat in a rough docking, you shouldn't delay in fixing the damage.
The gelcoat and its primer form the watertight barrier that protects your boat from osmosis.
When we think of gelcoat, we might first imagine its function as a mold release agent or the shine it gives to a boat's hull once polished.
But gelcoat and primer protect your boat's underwater hull, and for this reason, they must be kept in perfect condition.
Contact a dealer or obtain color charts from manufacturers like Sika, Schoeppen, or Evercoat, which allow you to approximate the shade of older, slightly "faded" gelcoat.
If the damage only affects the gelcoat and not the underlying composite, you must first prepare the work area. A thorough cleaning is required, with the goal of removing impurities and greasy films covering the damaged area.
Whether using hot water and a scouring pad or a high-pressure cleaner, everyone has their own method.
This cleaning should then be followed by degreasing with acetone.

On a new hull, gelcoat appears as a finished film less than 1 mm thick.
Therefore, when preparing the area to be repaired by sanding, you must attack the gelcoat over a wider surface area than the damage itself to allow the new material to bond properly.
Be careful not to over-sand, given the thinness of the gelcoat.
Depending on the size or type of damage to be treated, use a small sander or, for very small areas, a Dremel-type tool that can hold very small bits, which are very practical for working gently.
The work involves chamfering the damaged area to allow for a good bond for the gelcoat "plug."
Be careful not to go too deep and expose the final layer of fiberglass.

Next, outline the work area to be repaired with masking tape. Blue tape is waxed and peels off much more easily than yellow tape. Also, cover the area around the repair; gelcoat is pigmented and stains easily.
Clean and degrease again. Be careful with acetone around plexiglass windows, as it will melt them, and avoid using it on flexible seals, which can also be damaged by this treatment.

This epoxy layer ensures the composite is watertight.
On the degreased and cleaned surface, apply one or two coats of epoxy primer using a roller or spray gun.
This ensures the subsequent gelcoat adheres to your repaired or prepared surface while also providing an initial waterproof layer.
Let it dry.
Finally, sand lightly with 200 or 240 grit to ensure good adhesion for the gelcoat.
Note: It is not strictly necessary to apply an epoxy primer to areas that are not submerged.

If you are repairing a chip or crack in the gelcoat, the shallow depth of the damage (1 to 2 mm) allows you to fill it with the product itself in a maximum of two coats.
If your work follows more extensive repairs, you will need to apply a primer coat followed by a gelcoat layer.
Apply the first coat with a roller or brush.
Let it dry. The second coat adheres better to a dry first coat, so apply the second layer if needed.
To finish, whether you have applied one or two coats of gelcoat, cover it with plastic wrap. This will prevent airborne dust from settling into the fresh gelcoat and will reduce the amount of sanding and polishing required later.
Let it dry.

Now the finishing work begins.
To do this, you will need an orbital sander and then a polisher equipped with its polishing pads.
Start with 240-grit sanding discs, then move to 400, and continue to finer grits depending on the finish you want and your personal standards: 600, 800, 1200, and even 2000!
Once sanding is complete, it is time to move on to polishing.
Buffing or polishing can be done using a polisher with foam pads and a polishing compound, or with abrasive cloths and the same polishing compound.
Both systems are available in kits from marine supply stores or automotive maintenance wholesalers.
Finally, rinse thoroughly with water, and your boat will be protected and ready to go back in the water!
