Osmosis is a phenomenon that can affect composite structures when their watertight integrity has been compromised and during long periods in the water.
It is a very serious issue, and the resulting damage often leads to very long and costly repairs, if not the total scrapping of the vessel in question.
The boat of your dreams has blisters on its fiberglass polyester composite hull. Is it really a disaster? What preventive and curative work needs to be done, how should it be carried out, and what does it cost?

Osmotic pressure is a natural mechanism found at the heart of all living things. It is what maintains fluid balance in human blood and the body.
It is the force exerted by a solvent (water, in the case of boats) on a membrane to balance molecular concentrations on either side of it.
Water reacts with certain soluble components of the resin to form acetic acid through hydrolysis. This solution is more concentrated than the water present in the bilge or already introduced into the composite.
The difference in concentration between the inside and outside of the hull (which acts as a membrane) creates an osmotic pressure that reproduces and intensifies the phenomenon.
Osmosis: a chemical phenomenon that primarily affects older boats
This phenomenon appears mainly on older composite hulls, dating from before 1985.
Until the mid-1980s, manufacturers built what were known as "thick" hulls.
Fiberglass was sprayed on using a gun and embedded in polyester resin.
With the benefit of hindsight, we now know that this resin does not provide a watertight barrier.
Furthermore, during the spray-up process, because the resin was "spread" between each pass, its distribution was not homogeneous, leaving gaps between the fibers. These voids create tiny channels within bundles of fibers oriented in the same direction.
This technique, now abandoned, allowed air bubbles to form in these pockets. It is within these voids that water and the products of its reaction with the resin accumulate. Over time, this accumulation leads to delamination of the fiber-resin composite.

However, modern hulls can also be susceptible to osmosis.
This is particularly the case for hulls built using vacuum infusion that were not fully impregnated with resin during manufacturing.
Once exposed to a breach in the gel coat's integrity, these defects behave in the same way as those found in older hand-laid hulls.
In terms of defects, the fiber bundles are not fully impregnated with resin.
This lack of watertightness leads, through an osmotic reaction, to water being drawn in through the damaged gel coat.
Lacking oxygen, the water becomes acidic and attacks the polyester, while generating small amounts of gas that trigger the formation of blisters.
These blisters will soon fill with a reaction liquid.
Brackish water and thick hull laminates accelerate the process.
The phenomenon can just as easily occur from the inside on a hull without a gel coat, if the bilge remains constantly wet.
Much rarer cases involve composite hulls launched without a gel coat or coated with a poor-quality, porous gel coat. In these instances, gases and reaction products pass directly into the water without forming blisters.
The only detectable symptom remains delamination, a sign of an already advanced degree of degradation.
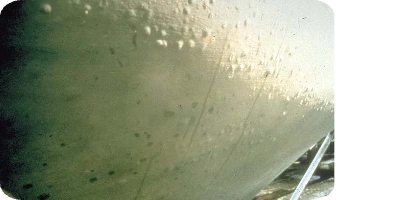
During the osmosis reaction, gases and reaction products create blisters on the gel coat. They range in size from 2mm to about fifteen centimeters in diameter.
A few blisters do not necessarily indicate advanced decay, but they do signal that the hull is currently degrading.
In the most severe cases, applying pressure to one blister causes another to react...
Pressing on some of these blisters releases a liquid with a vinegary smell: acetic acid, the driver of polyester delamination.
Sometimes the blister contents do not smell like vinegar, in which case a pH strip test is necessary.

Indeed, the osmosis reaction almost always produces acid.
The interaction between certain antifouling paints and an incompatible gel coat can cause a reaction between the two, which is harmless to the hull.

The permeability of products used in composite construction (blue = isophthalic/polyester resins, light blue = gel coats, and green = epoxy).
In fiberglass composites, isophthalic resin is generally used. These resins are not watertight. They are chosen over watertight epoxy resins for their lower cost and significantly shorter curing time.
Epoxy resins, on the other hand, are waterproof.

These devices can detect the presence of moisture, but caution should be exercised when interpreting their results.
It is impossible to pinpoint the location of moisture within the composite without invasive measurements.
Is it under the antifouling, under the gelcoat, or within the composite itself?
Furthermore, such measurements require a dry, clean hull to ensure the readings are accurate.
It must be clean because salt, which is hydrophilic, remains on hulls and retains moisture, skewing the readings. It is advisable to let hulls dry in dry air for a good month to get rid of surface moisture.
Some devices, like the Tramex, require stripping the composite or drilling small holes to take a measurement, while others, like the Sovereign, allow for measurements through the gelcoat and antifouling.
There is a lot of information and misinformation out there regarding osmosis treatments.
These treatments cover various scenarios depending on the depth of the affected fabric. Superficial osmosis will not require the same resources as deeper osmosis that has affected several layers of fiberglass.
Preventively treating a polyester hull against osmosis involves removing the antifouling and gelcoat by sanding, drying the hull, creating a waterproof barrier, and reapplying a new gelcoat and antifouling.
In curative treatments, the steps taken to eliminate blisters involve excavating the hull, which necessitates tedious filling, smoothing, and sanding operations, followed by the application of new antifouling.
To strip these products, expose the composite hull, and allow it to dry, some boatyards use sandblasting.
Whether dry or wet, the process requires a delicate touch from the operator, who must focus on the affected areas (the "blisters") without overdoing it, so as not to create deep gouges that will require extra filler during repairs.
We are not talking about kits that attach to a pressure washer, but rather pneumatic sandblasters powered by compressors—heavy-duty equipment.
Sandblasting creates peaks and valleys that will need to be filled with putty.

This involves using an electric planer held at arm's length. There are special small planers, though some people use electric wood planers. This is a job for the strong, as you are working with the tool overhead and these planers are heavy.
Planing creates dust but has the advantage of producing a flatter surface than sandblasting.
On the other hand, a planer removes the same amount of material with every pass, making it difficult to treat localized "blisters" with this tool.
In addition to being long and tedious, this method produces a massive amount of toxic dust. Furthermore, there is a very real risk of cutting too deeply into the hull, and ultimately, you will still need to sandblast to remove the deeper blisters.
This approach takes advantage of both techniques: the relatively smooth finish of planing and the depth of penetration on blisters provided by sandblasting. As a result, the amount of epoxy filler required is reduced compared to sandblasting alone.
Neutralizing acetic acid
A simple water rinse does not guarantee that all acetic acid has been removed from the hull. It must be neutralized with an alkaline solution to counteract the acid. Epoxy resin putties do not react well to acidity.
Whether you are hauling out in Corsica, on the French Riviera, in Finistère, or in Normandy, weather conditions have a major impact on how hulls dry.
Perfectly suited for the south of France, it is the wind and the Mistral periods—more so than the heat—that act most favorably on hull drying. 4 to 6 months of air drying with the gelcoat peeled back will allow the hull to dry thoroughly.
Be careful with cockpit drains, which should be diverted to prevent them from wetting the hull, and other similar sensitive points.
Using these devices leverages the Mollier diagram regarding air humidity. The warmer the air, the more water it can hold in vapor form. In our case, the moisture in the hull will transfer into the air, whose capacity to absorb it increases with temperature.
When working in a workshop under a tarp, be careful not to raise the temperature too high, as this risks damaging the material being dried. Tarping the ground under the boat limits moisture rising from the floor and increases drying efficiency at a low cost.
When drying under a tarp, using 6 to 8 dehumidifiers simultaneously with a forced-air heater will lower the air's humidity and increase its capacity to absorb moisture from the hull.

This method uses heating patches applied to the hull that enclose an absorbent material, followed by a vacuum pump that extracts moisture from the hull and transfers it into the absorbent medium.
They extract chemical compounds that air drying cannot remove (acids and glycols).
Their main advantage is the high drying speed, which takes about ten days.

Once blisters and other defects have been removed and the hull is dried and cleaned, you will need to apply smoothing epoxy filler—reinforced with woven glass fabric if necessary—to the affected areas to restore a uniform contour.
Several coats of filler followed by sanding with an orbital sander will be necessary to achieve a perfect shape.
In "preventive" operations, the gel coat is simply sanded without damaging the surface, so this filling work will not be necessary.

Once the hull's appearance has been restored by applying and sanding epoxy filler, it is time to rebuild the watertight barrier.
This will consist exclusively of epoxy primers and resins.
Only these products maintain their watertight properties on polyester hulls for about ten years.
Plan for at least two coats to build this barrier effectively.
To prevent the appearance of osmosis, the watertight barrier must be kept in good condition. This means repairing impacts without delay. Any scratch that reaches the depth of the gel coat must be sealed with an epoxy watertight barrier.
Covering deep scratches with antifouling paint does not provide a watertight barrier.
How you winterize your boat is another way to fight against osmosis.
The hull dries out more easily, the air humidity level is lower than when a boat stays in the water, repairs are easier to perform, and you aren't pressured by the time constraints of a boatyard's haul-out schedule.
Dry storage has many advantages.
